PERGOLA IDEAS AND INSPIRATION

With thoughts of Mexican sunshine, palm trees, and salty air still swirling in my head, I am SO ready to spend the remaining Summer outdoors. Which means I really need to get to work on the mess that has become my backyard. I suppose I’m exaggerating a bit – it really isn’t all that terrible, but it could definitely use a little personality. A trellis with grape vines in the back corner, some lavender and wild flowers, a small privacy trellis along the patio with some flowering vines creeping up…yes, that would do quite nicely. But the pergola, dear Lord, that’s a whole different story! It needs work.

Backyard Pergola Dining Chippy Side Table on Pergola

Currently, it consists of a hand-built table that my husband threw together out of old pallets found behind our house, cheap plastic chairs gladly passed along by my father, a glass-topped bistro table I had in my old apartment, an awkwardly sized vintage table I bought for a dime simply because I liked the chippy turquoise, and some decorative wall piece I found at Home Goods many moons ago. The chairs at either end of the table are actually lovely chairs purchased on a whim at Arhaus – a definite splurge considering we had no actual plan or space for them. I don’t even think they were meant to be outdoors, but there they reside nevertheless.

So one of the projects I have in store for the summer is a complete overhaul of said pergola. I know I just gave myself the challenge of spending less in order to travel more, but 1. this is already a project in the works, and 2. it’s kind of like creating a travel destination within the home, yes?

Seriously, I could make excuses all day, but there is nothing better than sitting outside with a beer in hand, watching your dogs and child play, all while being slightly protected from the blaring sun. Am I right?! So while we don’t have plans to enclose the pergola, we do have the thought to roof it. Honestly, I’m still a little torn on the idea, but this is what is currently in my head:

 Bohemian Styled Pergola

via Country Living

Still minimal, but with a boho (almost Mexican) vibe. Which means lots of greenery! Unfortunately, I don’t have the greenest thumb in the world, but I’m working really hard to remedy this.

I was also thinking about adding outdoors curtains to soften the space a little, like this, but with a more lightweight, airy fabric (maybe mosquito netting?):

Make Your Own Outdoor Pergola Curtains! (click through for tutorial)

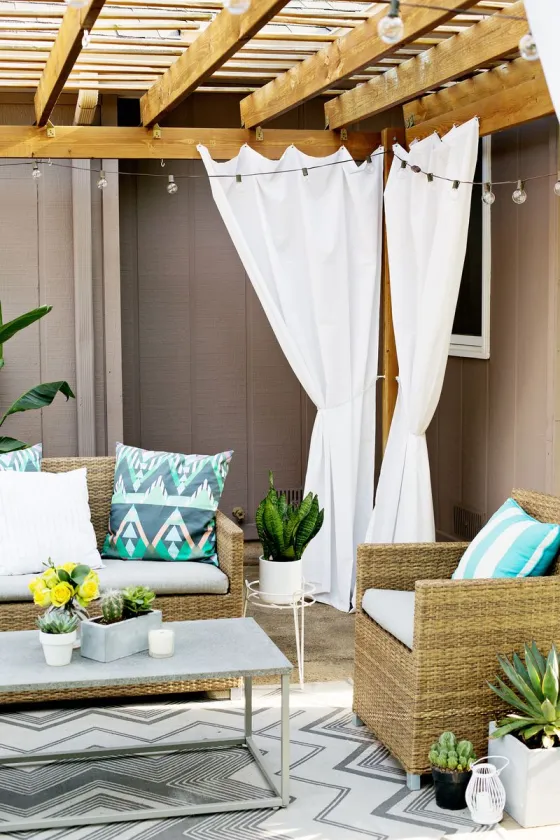
Image via A Beautiful Mess

And string lights are most definitely in order. But other than that, I’m kind of at a loss / totally open to wherever the wind shall take me. Should I build a corner bar in the far right corner or should I build extra seating? Should I hang some kind of fun, quirky seating in the left corner…?

Outdoor Hanging Chair Options

Images via The Merrythought and Broste Copenhagen

Or should I simply dedicate that space for all things green? I’d love to hear your thoughts and suggestions!

ps…how about this for a little backyard inspiration!

CYBER MONDAY: A FEW GOOD SALES!

While I wholly admit that I avoid Black Friday with a 100’ pole, Cyber Monday is another story. There’s nothing quite like shopping sales from the comfort of my own home! Unfortunately, rather than shopping for gifts as I should be, I’m getting sucked into a little retail therapy for myself. I know I wrote a post this morning, but I couldn’t help sharing a few great deals that I’m currently looking at…

Garden Side Chair

My husband and I have been looking for a few outdoor chairs for the table we built for our pergola last summer. Not only are these guys on sale for $98 at Home Decorators, but shipping, which would otherwise be almost $50 per chair, is currently FREE!

Hanging Pendant Lamp

I love, love, LOVE the industrial look of the pendant light, and the size is perfect. Today at Wisteria, you can get 25% off site wide! This light is typically $169 but with code thx25, you can get it for $126.75. Here it is in a dining room (so you can get a good idea for size)…

Hanging Pendant Lamp

The fern wall décor is also on sale for $149 each (originally $199)!

Boxwood Trees | west elm

I love the look of boxwood trees, whether in your home or on your patio. I do not, however, love the price tag that typically comes with them. At West Elm and for today only, not only can you get a LARGE boxwood tree for $31, but shipping is free!

Stage Set Design for the Play the Magnanimous Cuckold by F. Crommelynck, Meyerhold Theatre, Moscow Stretched Canvas Print by Liubov Sergeevna Popova at Art.comPortrait of a Young Woman, 1896-97 Stretched Canvas Print by Gustav Klimt at Art.com

Unfortunately, I don’t know too terribly much about art, but I do know what I like and I know where to find an excellent deal. Today only, Art.com is offering 30% off! These oversized stretched canvas prints are typically $249 on up – with 30% off, that makes them $175. Pretty hard to resist!

Plaid Fringed Blanket & Shams | Pottery Barn

And lastly, there’s something about a plaid blanket that oozes comfort. I can imagine myself in a log cabin, fire roaring, feet curled up, hot chocolate in hand, and plaid blanket thrown over my lap. Ah, perfection! This blanket from Pottery Barn is not only on sale for $119, but shipping is free!

Happy shopping Smile

THE VERY MERRY GIFT GUIDE: FARMHOUSE STYLE

Well hello – I hope everyone survived the Thanksgiving festivities! Despite the very full house and the overabundance of cooking, I actually survived and had a fun time doing it. Amazingly, I only managed to stress out once by attempting to kick my husband’s very helpful hands out of the kitchen. And like the wonderful husband that he is, he completely ignored my ravings and went about helping with the cooking (I’m thankful for a husband that knows his way around the kitchen!).

But while I had a GREAT time with the family, I can now let out a little sigh of relief. Thanksgiving is over. I have the house back and time to myself. This is me doing a happy dance….

Yipeee!

Ok, now on to bigger and better things – Christmas! (I did warn you that as soon as Thanksgiving was over, I’d fall right into Christmas, didn’t I?).

I must admit, while I do love a good bargain, I am NOT a Black Friday shopper. The early morning, the crowds, the ensuing chaos of a sleep deprived crowd….nope, I choose to sleep in and have a long, leisurely brunch with family and friends.

But every year, despite my intentions to start shopping the week following Black Friday, I find myself procrastinating and pulling my hair out in a desperate attempt to find that perfect and very last minute gift. Anyone else feel this way?!

This year, I vow to break the cycle.

To help me – and all those that find themselves in the same boat, year after year – I’ve decided to create a gift guide to get my shopping juices flowing!

So let us begin!

Gift Guide: Stylish Farmhouse Living

1 /2 / 3 / 4 / 5 / 6 /7 / 8 / 9 / 10

DIY THURSDAY: MIRROR, MIRROR, ON THE WALL…

Call me vein, but I love mirrors. They can add light and depth to any room; they can be an architectural element, an intricate detail, or a bold surprise. So when I come across large, framed mirrors on my pickin’ trips (for a good price, of course), I immediately snatch them up.

Take this guy, for example…

Gold Mirror

I came across this mirror while at a junk store out in Richmond, VA, and I couldn’t resist the amazing detail – but the color was this gaudy, spray-painted gold that hid those intricate details. So in my typical DIY fashion, I broke out my paint brush, a can of Old White Annie Sloan Chalk Paint, some sandpaper, and Annie Sloan’s clear AND dark wax.

When working with details like this, the dark wax works wonders – truly! It gives the piece that aged, antique look while really making every little detail pop with that perfect patina.

So after painting the piece entirely white (two coats), I hand distressed it with 180-grit sandpaper, waxed the piece first with the clear wax, buffed it, and then added the dark wax (*unless you want to attempt to use the dark wax as a stain, ALWAYS wax the piece with clear or natural wax before using the dark wax). When using dark wax, you really want to get it deep into the grooves and details – don’t be shy!

Gold Mirror Waxed

Typically, it’s best to work in sections, dark wax on, clear wax off, allowing the dark wax to stay in the nicks and grooves, but waxing/buffing the majority off with the clear wax, leaving only a tinted patina behind. See how the details really begin to pop?!

After rubbing in the dark wax, and buffing off with the clear wax, I ended up with this…

Large Mirror Styled

Large Mirror Macro

Not too shabby, eh?

Any mirror can be painted, and with just a little TLC, you can change the whole dynamic of a room. A few more examples:

Tuscan Mirror

BEFORE: I’m just starting to paint the piece in Annie Sloan’s Paris Grey.

Tuscan Mirror After

AFTER: Hand distressed and with a hint of Annie Sloan’s Duck Egg

Tuscan Mirror Macro

Or, here’s something that has no intricate details at all, but still turned out pretty awesome…

Large Mirror

Unfortunately, I don’t have a true “BEFORE” picture – this is the mirror painted in Annie Sloan’s Paris Grey.

Reclaimed Bookshelf copy

AFTER: hand-distressed, dry-brushed with Old White, and dark waxed.

Large Mirror Macro

What do you think – do you have a mirror needing a bit of an update? If so, I’d love to see before and after pictures!

Linked to:

Furniture Feature Fridays

DIY THURSDAY: SIMPLE SHELVING

One of my favorite things to do to to give myself that added storage while still maintaining an easy, elegant look, is to create a simple shelving system. Thankfully, this does not entail a trip to Ikea or the Container Store, and better yet, it’s cheap! A quick trip to Lowes or Home Depot – and if you’re feeling particularly adventurous, to Anthropologie, Pier 1, or World Market for more detailed and fun hardware – should do the trick…

Dining Room Shelving 3

(always ready for a dinner party!)

What you will need for the shelving:

  1. Lumber! For my dining room shelving, I simply purchased 2 boards at a 2” thickness, and cut them down to whatever length I needed.
  2. A few shelving brackets, depending on the number of shelves you plan to create. You will need no less than 2 brackets per shelf.
  3. Stain and/or paint color of your choice and a wax (I use Minwax in Natural or Annie Sloan’s clear wax) to finish.
  4. Cloths to wipe on and off the stain, paintbrush, sandpaper.
  5. Saw, drill, and drywall screws.

Once you have cut your wood down to appropriate size, get ready to stain! Since I knew I wanted a dark base layer before I painted and distressed the white top coat, I chose Minwax stain in Ebony. I put on two coats of the stain to get the desired color and allowed the penetrated stain to fully dry before painting each piece in Annie Sloan’s Old White.

Shelves for Shelving 2

To distress the piece, I simply used a sheet of 180-grit sandpaper and sanded away until I achieved the desired look. Once both pieces were painted and sanded, I finished with Minwax wax in Natural just to give it a nice, natural sheen.

Dining Room Shelving 5

Once you have the shelving pieces painted and waxed, you’re ready to hang!

The shelving brackets I used were from Anthropologie:

Shelving Brackets

but you can easily find other brackets at your local hardware store, like the ones I used for my living room shelving (mental note: when purchasing your lumber, make sure you get an appropriate thickness that can hold the weight of your decor! You can see in the picture below that my shelf is beginning to bow, which means that I will eventually need to re-stain and replace the shelf with a thicker piece…).

Living Room Mantle 2

Once you have your shelving up, you’re ready to decorate! Have fun with it. This is the perfect opportunity to show off all of your flea market finds!